| Author |
 Replies: 3,764 / Views: 245,255 Replies: 3,764 / Views: 245,255 |
|
|
|
Pillar Of The Community
United States
2942 Posts |
|
|
Sorry, you all deserve a better image but I'm too lazy after a long day. I love that the stamp was used but maintains that sharp point at the top of the separated part. 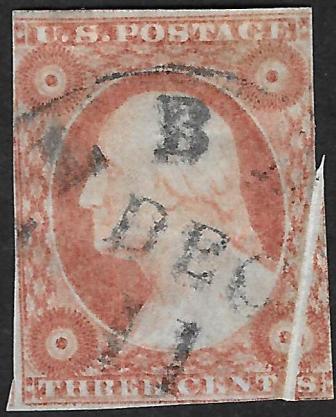 |
Send note to Staff 
|
|
|
Pillar Of The Community
United States
2226 Posts |
|
|
I like yours the best of the pre-print creases, Stephen, the way it looks jagged after it opened up! |
|
Send note to Staff
|
|
|
Pillar Of The Community
United States
2226 Posts |
|
|
#10A Position 38L1i shows a short transfer at top right. I like how the cutting of the frame line after the entry was made on the plate draws my attention to the design fading out.  |
|
Send note to Staff
|
|
|
Pillar Of The Community
United States
939 Posts |
|
|
Classic Coins, that is interesting. Thanks for sharing. And it made me look. Here's a similar short transfer, but it looks like a double transfer at the same time. And what's going on with the URDB? 8L1L 11A Definitely a worn plate. 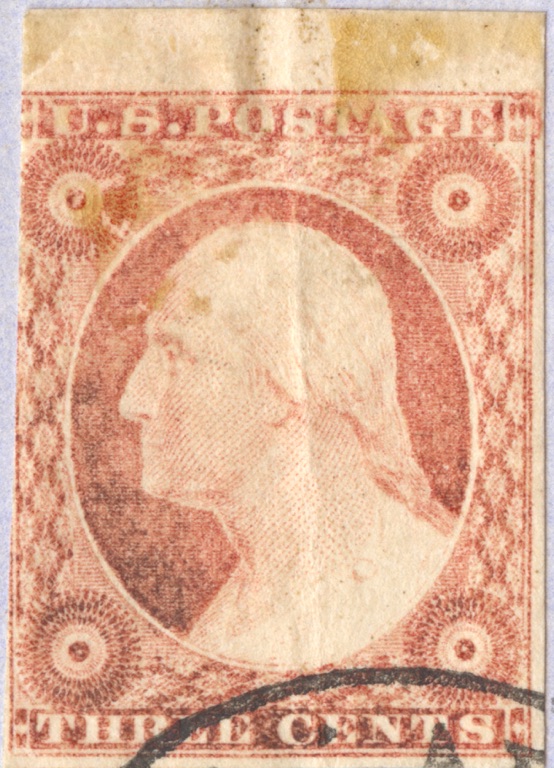 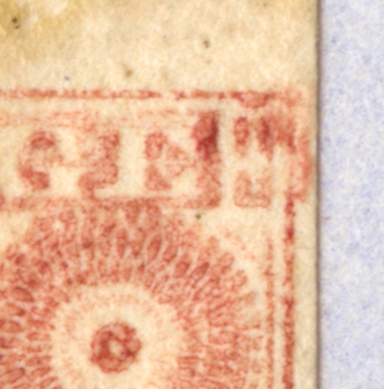 |
|
Send note to Staff
|
| Edited by Moyock13 - 07/01/2020 11:23 am |
|
|
Pillar Of The Community
United States
3489 Posts |
|
|
38L1i - that's a good short transfer at top.
There are numerous positions of US #2 that are short transferred at top as well. There is a resemblance. |
|
Send note to Staff
|
|
|
Pillar Of The Community
United States
2226 Posts |
|
|
Moyock13, Aside from the URDB showing the typical plate 1L gouging out/heavy inking, your 8L1L shows an inking anomaly to the right of the URDB and outside the frame line that isn't consistent for this position.
A peroxide pre-wash, a bath, and a good pressing likely would improve the appearance quite a bit. |
|
Send note to Staff
|
|
|
Pillar Of The Community
United States
939 Posts |
|
|
I've always been a little chicken to do a peroxide pre-wash. Any tips to help me along? |
|
Send note to Staff
|
|
|
Pillar Of The Community
United States
2226 Posts |
|
|
Your 8L1L would be a good one to practice with. I would recommend these steps:
Soak it in 3 percent peroxide for about 30 minutes
Move it to a bowl of distilled water for about 10 minutes to neutralize the peroxide (maybe give it one additional distilled water soak)
Pat the stamp lightly between napkins or paper towels
While the stamp is still damp, put it between two sheets of wax paper and into a big heavy book
Stack some weight on top of the book.
I always move the stamps from the wax paper to between two other pages after at least 12 hours in the wax paper, and leave them there for another 12 hours
Parchment paper may also work. You may also try not using wax or parchment paper if you're sure the ink from the book won't transfer to your stamps (glossy pages should be best)
|
|
Send note to Staff
|
|
|
Pillar Of The Community
United States
939 Posts |
|
|
Pillar Of The Community
United States
2226 Posts |
|
|
You're welcome, Moyock13. I'll look forward to it.
Edited to add: In this example, the peroxide should remove some of the black color from the inked areas, but it likely won't completely restore the original color. |
|
Send note to Staff
|
| Edited by Classic Coins - 07/01/2020 1:35 pm |
|
|
Pillar Of The Community
United States
606 Posts |
|
|
classic coins -- nice short transfer on the 38L1i -- the TLB on my copy looks the same, but as the right half of the TFL on mine is shaved above the TAGE of POSTAGE, the contrast between the frame line and the fade out of the design is no where near as pronounced. Very nice!
Moyock13 -- your 8L1L is very interesting. As classic coins pointed out it is not a consistent plate variety (I also checked multiple other copies of the position to confirm this). That said -- the inking is clearly a partial duplication of the URDB -- and it occurs twice -- once to the right of the URDB -- and again outside of the RFL. In other words, what we are seeing is not just a couple of blobs of stray ink. Yet I see no other duplication of any other parts of the design anywhere else on your stamp. Very curious as to what might have caused this? Thoughts anyone?
Regards // ioagoa |
|
Send note to Staff
|
|
|
Pillar Of The Community
United States
939 Posts |
|
|
You know, I got all ready to do the pre-wash and then had one of those "DOH!" moments! The 8L1L is on a folded cover, tied to it by a nice TROY NY town cancel. So, back to the drawing board.
I don't suppose that there is a method of cleaning without removing?
|
|
Send note to Staff
|
|
|
Pillar Of The Community
United States
2226 Posts |
|
|
Some say you can lay the cover face down over a bowl of peroxide for a lot longer than 30 minutes, perhaps a full day, without soaking it, and it will remove the effects of oxidation. I've never tried. |
|
Send note to Staff
|
|
|
Valued Member
170 Posts |
|
|
You can find containers like the one below that I use as an H2O2 fumerie. H2O2 goes in then the green platform then a cover then the top. This container is Rubbermaid and is 6.5" x 4" x ~3". I fume a cover for blocks of 2 hours. 8 hours is usually enough but I have left covers in for as long as 12 hours. Sometimes a stamp loosens a bit but have never had one come off. Covers vary in how much moisture they take up but I flatten each one between heavy blotter sheets and a stack of books for as long as it was in the fumes. Works pretty well. 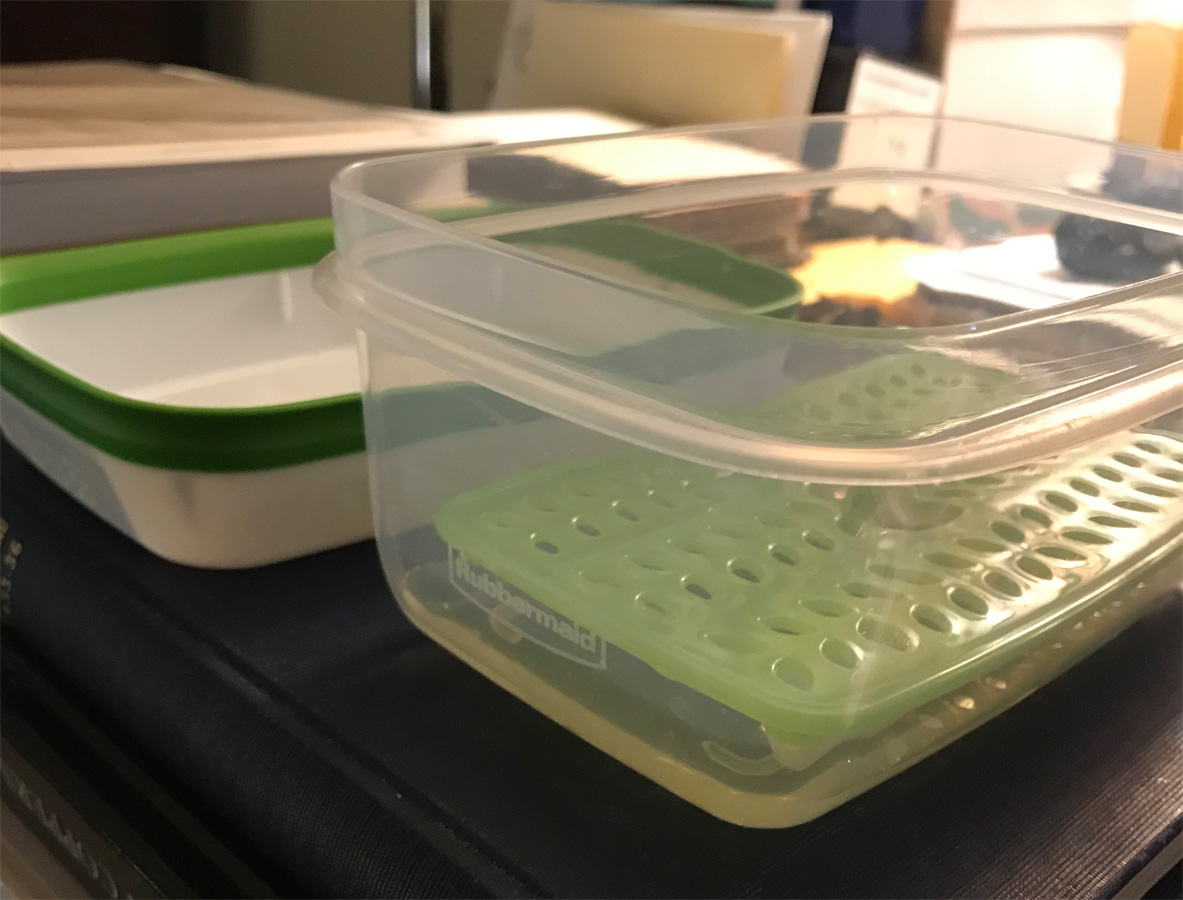 Edit: I put my covers face up. |
|
Send note to Staff
|
| Edited by banknoteguy - 07/01/2020 6:58 pm |
|
|
Pillar Of The Community
United States
939 Posts |
|
|
Interesting, so what I'm reading is that you can actually clean an oxidized stamp on cover by fuming the cover. Huh, might have to give that a go. |
|
Send note to Staff
|
|
|
Replies: 3,764 / Views: 245,255 |
|


