Stamp Community Family of Web Sites
Thousands of stamps, consistently graded, competitively priced and hundreds of in-depth blog posts to read


Stamp Community Forum
 
Username:
Password:
Save Password
Forgot your Password?

This page may contain links that result in small commissions to keep this free site up and running.

Welcome Guest! Registering and/or logging in will remove the anchor (bottom) ads. It's Free!

How Would You Grade Them?

Previous Page
 
To participate in the forum you must log in or register.
Author Previous TopicReplies: 22 / Views: 4,176Next Topic
Page: of 2
Pillar Of The Community
United States
1942 Posts
Posted 08/29/2014   12:13 pm  Show Profile Bookmark this reply Add essayk to your friends list  Get a Link to this Reply
Yes I was seeing that, and here is my side view, with alignment starting at the bottom and deviating upward:


I also noted that the holes are not uniform in how closely they approach the design at the bottom. It is not hard for me to imagine that the stamp lost some of its height by reperfing the bottom. That also might explain why I could not get design alignment between the images comparing top to bottom or bottom to the sides starting in the corners, but I could when comparing the top to the sides.


Send note to Staff  Go to Top of Page
Edited by essayk - 08/29/2014 12:20 pm
Pillar Of The Community
United States
578 Posts
Posted 08/29/2014   12:38 pm  Show Profile Bookmark this reply Add srailkb to your friends list  Get a Link to this Reply
Because of paper shrinkage and subtleties with scanners, I don't recommend rotating sides 90 degrees to compare perfs as you've done. Doing so is likely to give many false reperf positives.

Also, whatever program you're using for the manipulation, I'd strongly recommend learning how to change the opacity of a layer so you can overlay the perfs and make a precise alignment. Going through the exercise of "cropping" the image right to the edge of the perf tips is unnecessary (and yields an inferior result anyway.) If your software isn't capable of changing the opacity of a layer, download GIMP - it's free, very powerful and does everything you need to do the test.
Send note to Staff  Go to Top of Page
Pillar Of The Community
United States
1942 Posts
Posted 08/29/2014   1:36 pm  Show Profile Bookmark this reply Add essayk to your friends list  Get a Link to this Reply

Quote:
Also, whatever program you're using for the manipulation, I'd strongly recommend learning how to change the opacity of a layer ...


With all due respect, Ken, I don't think you're reading my posts, or that in philatelic matters you recognize you are speaking to a peer. On 8/27 I had posted:

Quote:
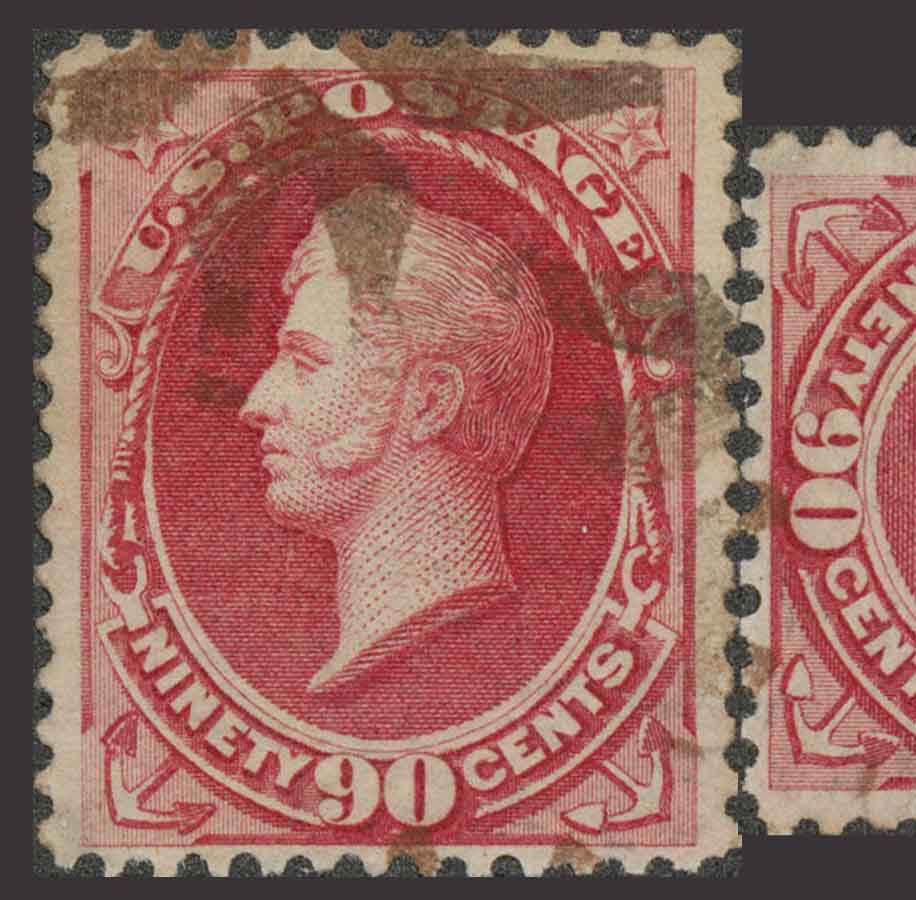
In Photoshop I subjected both stamps to the srail test, Ken.


I am not inclined to migrate to GIMP in lieu of Photoshop. If you are familiar with Photoshop you know it can handle opacity changes. And you may assume I know how to use it, since you have seen plenty of samples of my work with it on this web site.

What I do not yet know how to do is conduct the imaging and measurement of stamps YOUR way. You have been down this road, but no one has taught me your method, and I am not finding it altogether intuitive to invent it on my own, though it is not complicated either. But please forgive me if I do not do these tests up to Hoyle just yet, and if you care to do it, brief me on what needs to be done, and the caveats, so I can.

Your reminder about paper shrinkage is a good one. Familiar as it is, it didn't occur to me to apply it here. I thank you for the reminder. Any other land mines I should watch out for?

The solution to poor results from poor technique is not total abstinence. Teach me to fish, and ....
Send note to Staff  Go to Top of Page
Pillar Of The Community
United States
578 Posts
Posted 08/29/2014   1:55 pm  Show Profile Bookmark this reply Add srailkb to your friends list  Get a Link to this Reply
I've been asked for a "step-by-step" instruction guide to the "Srail test" and intend to do one. Maybe the questions here will get me going. The problem of course is that everyone has different software. I use Photoshop CC, and can write the guide for that, but it's fairly expensive and almost everyone will use something else (like Elements, Paint, whatever.) I mention GIMP because it does everything necessary and it's free. That may not help you, but may help others.

Also, sorry -- I haven't been a member here long enough to know everyone well, what scans they've posted, what software they have at their disposal, etc. Still getting my feet wet - sorry if my comments above came off the wrong way.
Send note to Staff  Go to Top of Page
Pillar Of The Community
United States
578 Posts
Posted 08/29/2014   2:08 pm  Show Profile Bookmark this reply Add srailkb to your friends list  Get a Link to this Reply
Briefly...What I usually do is make a rectangular selection which includes the (full) perfs from one side (plus a little of the surrounding area.)

In Photoshop, Ctrl-C then Ctrl-V will copy that selection and paste it over the image as a new layer (assuming you haven't changed default behavior.) Hitting the "5" key will change the opacity of that new layer to 50% (6 = 60%, 8= 80%, etc.) drag that layer into position with the move tool (or with the "move" tool selected, bump it into place with the arrow keys.)

I align the first 3-5 perfs at one end as best I can (moving the new layer over the other side such that the perfs form perfect "circles") and look at the alignment along the remainder of the side. I'll often do this at 800% (or higher) to make sure I'm making the best fit on that end (I generally scan at 600 dpi, 300 dpi minimum for this test.) When the gauge isn't the same at the other end (edges don't line up) or if one of the sides diverges (circles at one end, ovals at the other,) you can state with high certainty that one of the two sides is reperfed.

If you want to quickly merge (flatten) all the layers when you're done working, select the top layer in the stack and hit Ctrl-Shft-Alt-E. That will create a merged/flattened single layer on top of all the others.

Hope that helps (at least for Photoshop users.)
Send note to Staff  Go to Top of Page
Pillar Of The Community
United States
1942 Posts
Posted 08/29/2014   3:58 pm  Show Profile Bookmark this reply Add essayk to your friends list  Get a Link to this Reply
Great! Thanks for that, Ken. Couple of questions.

1. How much do you "crunch" the perf tips when aligning? Some are long and overlap. Some are short and don't meet. Touching short to short can give a deformed circle even when the perfs are good. Any kind of benchmark on that?

2. Does the relationship between the alignment of the perfs and the stamp design matter? For example, (case 1) the top and bottom perfs when aligned show alignment of the stamp design at its edges; versus (case 2) the need for a strong shift from design alignment right or left to get the perfs in line. Is this telling you anything, or should we ignore the design alignment?

Send note to Staff  Go to Top of Page
Pillar Of The Community
United States
578 Posts
Posted 08/29/2014   4:17 pm  Show Profile Bookmark this reply Add srailkb to your friends list  Get a Link to this Reply
I don't worry about perf tips & whether they overlap at all -- I line up the first 3-4 holes as best I can to make perfect circles. With the opacity reduced, it doesn't matter how long a perf tip is. In fact, if you look at the test I did on the 155 (IMO 166) earlier in this thread, you'll see that almost every perf tip from top & bottom overlapped to some extent (the brighter areas between perf holes are areas of overlap.)

In general, the design will NOT align when you're making those perfect holes on one side. That's normal. Stated another way, when you move the top perfs down to the bottom, you will almost certainly have to move that block left or right in order to line those first three holes up. Ditto for the sides, when you move the left side to the right, you'll have to move that block up or down a little in order to line the holes up at one end.

What's important is that the gauge of both sides is exactly the same, and that the sides are exactly parallel. You can have a perf out of whack here and there (pins break & bend) but to have several in a row with the wrong gauge, or a diverging line of perfs (non-parallel) is an almost sure sign of alteration.

Hope that answers the questions.
Send note to Staff  Go to Top of Page
Page: of 2 Previous TopicReplies: 22 / Views: 4,176Next Topic  
Previous Page
 
To participate in the forum you must log in or register.

Go to Top of Page

Disclaimer: While a tremendous amount of effort goes into ensuring the accuracy of the information contained in this site, Stamp Community assumes no liability for errors. Copyright 2005 - 2026 Stamp Community Family - All rights reserved worldwide. Use of any images or content on this website without prior written permission of Stamp Community or the original lender is strictly prohibited.
Privacy Policy / Terms of Use    Advertise Here
Stamp Community Forum © 2007 - 2026 Stamp Community Forums
It took 0.31 seconds to lick this stamp. Powered By: Snitz Forums 2000 Version 3.4.05