Stamp Community Family of Web Sites
Thousands of stamps, consistently graded, competitively priced and hundreds of in-depth blog posts to read


Stamp Community Forum
 
Username:
Password:
Save Password
Forgot your Password?

This page may contain links that result in small commissions to keep this free site up and running.

Welcome Guest! Registering and/or logging in will remove the anchor (bottom) ads. It's Free!

Identifying Legitimate Admiral 2 Cent Green Coils (#133)

 
To participate in the forum you must log in or register.
Author Previous TopicReplies: 12 / Views: 3,212Next Topic  
Valued Member
Canada
228 Posts
Posted 02/18/2015   2:28 pm  Show Profile Bookmark this topic Add Scottamer to your friends list Get a Link to this Message
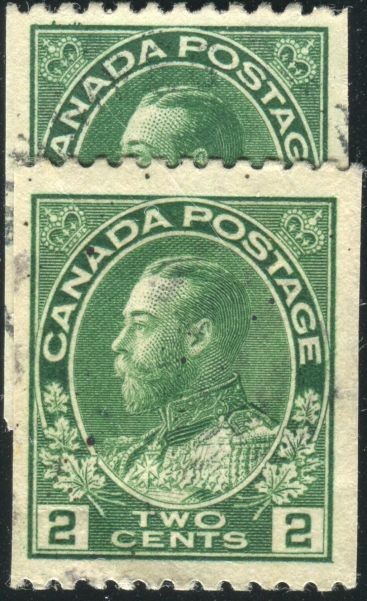
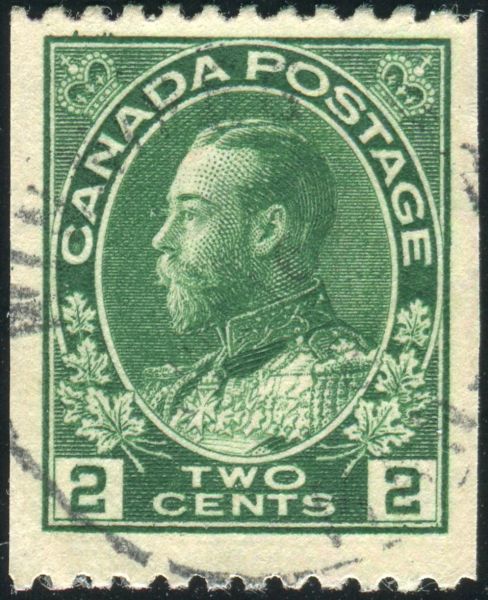
The Admiral 2 cent green perforated 12 horizontally (#133) seems to be one of the more popular faked items in all of Canadian philately. George C. Marler, in his classic Admiral tome, describes examining a lot of 1500 copies and not finding a single legitimate copy. He further goes on to describe some aspects for authenticating this issue.

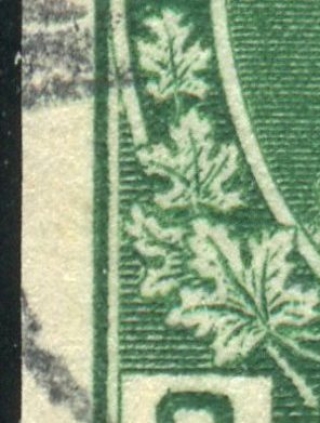
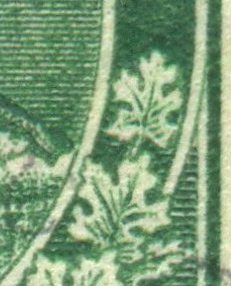
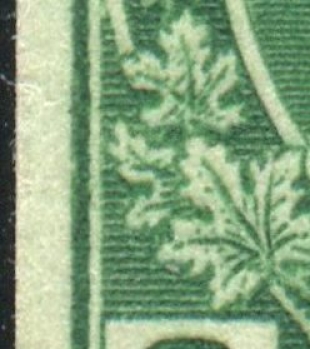
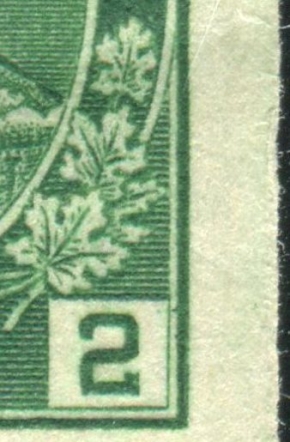
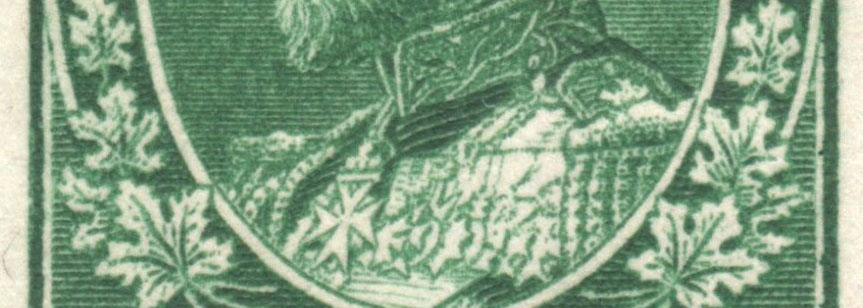
As is often the case with Marler, these descriptions are not always completely clear and require some reference to other parts of his book for further enlightenment. His three criteria for spotting the legitimate #133 include: (1) a break in the outer left frame line beside the second leaf from the bottom, (2) two "breaks" in the right side of the portrait oval at the level of the King's shoulder and 6 or 7 lines above it, (3) a small mark in the margin about 1mm right of the right numeral box. The book includes an image to illustrate this that does not show point 3 above. So it would appear that point 3 is optional in legitimising this stamp.

Since the #133 coils were all made by attaching strips of 20 from the post office sheets of #107, the specific type characteristics described above can be identified as coming from specific plates (165 to 172) of the regular sheet issue. Marler's description of this type does not include the margin dot (point 3 above) although he does indicate that it "appears on these plates". He also describes the second break in the portrait oval more specifically as being "seven" lines above the break at the shoulder. It should be noted: (1) that the left frame break is always a partial break that effects only the outer of the three engraved lines that make-up the frame (which appears as a single thick line on almost all printed copies), (2) in my experience, the "breaks" in the right oval are not consistent in that some (particularly the upper break) appear more as light areas rather than complete breaks in the oval line.

The relevant criteria mentioned are all illustrated in the image below. A couple of other recent ebay auction images showing criteria 1 and 2 are also shown.


What is interesting is that Marler uses these criteria to address faked coils created from the imperforate issue or the booklet panes for the 2 cent green. Since these issues were not printed with plates with this type, these criteria are indeed an easy way to spot these sorts of fakes. Indeed, several current ebay auctions clearly show fake #133 stamps that do not have these criteria.

The elephant in the room that everyone seems to ignore is that the sheet stamps can also be used to fake these coils in a very similar way to how the printers created the original coils in the first place. Trimming the left and right perforations from sheet stamps printed using the appropriate plates would create quite reasonable fakes as long as copies with wide margins were used. The stamps from the sides of the sheets with straight edges would seem to be particularly useful for this purpose. To my way of thinking, this makes the width of these coils another significant criteria for validating a legitimate copy.

Of course, as most of us will recognise, most coils created by the post office from sheet stamps in this era show a marked difference in their widths, so it may be difficult or impossible to determine a legitimate #133 from a cropped #107. Since the legitimate coils were created from the sheet stamps, and since perforation placement varies, there may be no way of actually differentiating modern fakes from legitimate coils created in this way.

This is the situation as I see it: the best examples of mint #133 coils should be sufficiently wide and centered enough to virtually preclude trimmed side perforations and they should also include Marler's third criteria (the margin dot) to provide a very high but still no absolute authenticity. It should be noted that many legitimate coils will not exhibit these characteristics. Finally, since the current Unitrade catalogue value for a VFNH #133 ($300) is only a little more than double the price of the #107 ($135), and since these differences become progressively less significant when retail values are concerned, the profit to be gained by faking mint versions of these stamps is not very motivating to fakers. Used copies are a completely different story. To my thinking, the gross difference in catalogue prices would lead to a multitude of fake used copies of this coil stamp and dated cancelations on the stamp or tied to a cover would be the only ideal (though still not perfect since these can also be faked) way of authenticating them.

The main take-away here is that the breaks in the left frame and right portrait oval are not enough to distinguish a good fake for this issue. Despite the long post, I am not an Admiral issue expert and I would encourage comment form others who are about this issue. Thanks if you read this far.
Send note to Staff
Edited by Scottamer - 02/18/2015 3:54 pm

Pillar Of The Community
United States
7076 Posts
Posted 02/18/2015   2:35 pm  Show Profile Bookmark this reply Add Cjd to your friends list  Get a Link to this Reply
Nice write up.
Send note to Staff  Go to Top of Page
Pillar Of The Community
923 Posts
Posted 02/18/2015   3:42 pm  Show Profile Bookmark this reply Add sak to your friends list  Get a Link to this Reply
Thanks, Scottamer. Had my "loop" out to look for the dot... can't see it. (yet)
Send note to Staff  Go to Top of Page
Pillar Of The Community
Canada
528 Posts
Posted 02/18/2015   4:05 pm  Show Profile Bookmark this reply Add stamporator to your friends list  Get a Link to this Reply
Hi Scottamer,

Thank you for a very well thought out and presented description of the Scott 133 coil.

Just to confirm that having these three (3) described marks does NOT 100% guarantee that it is a Scott 133.

Here is a Scott 107, most likely from Plate No. 165 to 172, which has these marks. If I were to have a remove the left and right perforations then these could be seen as a Scott 133. Using a jumbo sheet #107 to make this change, would result in a very good forgery.


- stamporator -
Send note to Staff  Go to Top of Page
Pillar Of The Community
Canada
528 Posts
Posted 02/18/2015   4:11 pm  Show Profile Bookmark this reply Add stamporator to your friends list  Get a Link to this Reply
Here is another interesting Scott 133.

This is a coil paste-up pair (Scott 133i). The lower stamp has the three (3) described markings, whereas the top stamp does no!


- stamporator -
Send note to Staff  Go to Top of Page
Valued Member
Canada
228 Posts
Posted 02/18/2015   4:28 pm  Show Profile Bookmark this reply Add Scottamer to your friends list  Get a Link to this Reply
Hi stamporator,

Thanks for your interesting relies to my post.

You reinforce my point quite explicitly with your first reply. Chopping the perfs off a jumbo margin stamp similar to what you have posted would create more than "a very good forgery". I would argue that it could create a perfect forgery that is undetectable from the genuine article. Of course this assumes that the chopping on the sides of the stamp would be done correctly. Much easier and more convincing than faking these using imperforates or the booklet panes which would require some fake perfs added as well.

Your second reply adds a very interesting and crazy example. Whoever created this either combined two fakes that did not each match the known plating criteria or actually grafted a fake coil to a real one. Ouch!
Send note to Staff  Go to Top of Page
Moderator
Learn More...
United States
5094 Posts
Posted 02/18/2015   4:40 pm  Show Profile Bookmark this reply Add Partime to your friends list  Get a Link to this Reply
Well, I'm totally bummed. My most recent purchase does NOT show these indications. Maybe I can get a refund from the seller with this info. (He's pretty reliable, so should be OK.) I was actually wondering about the right side cut. Thanks to SCF.

Send note to Staff  Go to Top of Page
Pillar Of The Community
United States
725 Posts
Posted 02/18/2015   4:41 pm  Show Profile Bookmark this reply Add watermark to your friends list  Get a Link to this Reply
Here are a few more things to consider on this stamp.
The #133 coil stamp was printed by the wet process so as the paper dried the image shrank with the paper. None were produced by the dry process printing.

Example showing the top partially hidden real 133 wet printing over laid with a fake coil made by a dry printing processed stamp.


The design width on the dry printed fake is considerably wider. So if you have a dry printed copy there is no problem in identifying the fake. The next problem arises if the fake is also a wet printing.

I present a copy here I think might be genuine. However, it does not show the left frame line break or it is filled with ink. The frame line appears to be strengthened on this one it is a wet printing process stamp and does have the breaks in the portrait oval.


Here is my genuine copy to compare. The left frame line shows break and the breaks are present in the portrait oval. I do not see the dot right of the numeral box.


Any comments on these are welcome.
Send note to Staff  Go to Top of Page
Valued Member
Canada
228 Posts
Posted 02/18/2015   7:31 pm  Show Profile Bookmark this reply Add Scottamer to your friends list  Get a Link to this Reply
Hi watermark,

Your comment about all the genuine coils being from wet printings is extremely valid and another good clue to identifying faked coils made from dry printings. As one of my previous posts demonstrates, wet printings of the Admirals do not always provide enough horizontal shrinkage to be readily identifiable by width alone.

Note that the break in the left frame line is necessary to identify the genuine coil with Marler type R (2) 5 from plates 165-172 which was used for the coils. The other two breaks in the portrait oval also exist without the break in the left frame line in Marler type R (2) 4b which is from parts of plate 164 which was not used for the coils. It is unlikely that your first feature copy is genuine for this reason although I guess some over inking could have filled the left side break, destroying the evidence so to speak. This does not seem likely in my opinion given the look of the rest of the stamp.

Your second featured copy is really interesting. The centering on this suggests that it COULD be a straight side copy from the edge of the PO sheet that has had the left side perforations trimmed from it. This is a perfect example of what I was referring to in my original post. To me it is an example that cannot be definitively proven to be an authentic coil although there is nothing to suggest that it is not.

Basically, whether this stamp was trimmed slightly off-centre from a non-perforated sheet by the post office in 1922-1924 to make a genuine coil or later faked by trimming the left-side perfs off a regular perforated stamp from sheets using the same plates, there is no sure way to know. At least no sure way that I am aware of.

It would seem that this coil stamp is over-valued in the catalogues if exact versions can be created from lesser-value regular two cent sheet stamps. The price differential for used copies is way out of whack and certainly a strong motivation for fakery.
Send note to Staff  Go to Top of Page
Edited by Scottamer - 02/18/2015 7:36 pm
Valued Member
36 Posts
Posted 02/19/2015   10:30 am  Show Profile Bookmark this reply Add AdmCol to your friends list  Get a Link to this Reply
This is an excellent discussion augmented by some very useful illustrations.

The subject of identifying fake Admiral 2c green endwise coils has been discussed previously:

1. Randall W. Van Someren's article on the BNAPS website:

http://www.bnaps.org/ore/VanSomeren...ps-Fakes.htm

2. An article by R. C. Martin that was published in Canadian Philatelist, Vol. 9, No. 6, Nov.-Dec. 1958. This issue of Canadian Philatelist is available online at the RPSC website:

http://www.rpsc.org/tcp/index.php

Both of these articles describe one other indicator of a fake 2c green endwise coil: the roughness of the straight edge. On sheet stamps from the edges of the pane, the straight edge tends to be "rough" compared to booklet and coil stamps where the straight edge tends to be smooth and very clean-cut.

Referring to the image of the fake coil posted by Partime, the straight-edge on the left side is rough, not smooth, which would indicate that it is probably a fake. Of course, the straight-edge on the right side isn't straight - it has small curves, which is an obvious give-away.

Referring to watermark's post, the straight edge on the right side of his genuine example is also rough, so I would question whether it actually is genuine.

This roughness can also be used to distinguish between sheet stamps and booklet stamps (see Van Someren's article again). HOWEVER, there is an exception to this. The edge of booklet panes from the top and bottom edges of the sheet are rough just like the straight edges of sheet stamps. In fact, if you know that a booklet pane is genuine and it has a rough straight edge at the top or bottom, then you can conclude that the booklet pane comes from the top or bottom of the sheet. You can partially plate booklet panes using the straight edges!

Does the same exception apply to the 2c green endwise coil? The answer depends upon how the coils were manufactured from the sheets of 400:

a) Were the sheets guillotined into panes of 100 prior to producing the coils? If they were, then the endwise coils from the straight-edge side of the pane would have a rough straight edge on one side. I believe the sheets were NOT guillotined into panes before they were used to produce coils, BUT I do not know for certain.

b) How were the left and right sheet margins trimmed away? Using the same slitting equipment used to produce the rolls of coils? If so, the coils along the left and right sides of the sheet would have the same smooth straight edges as all the other coils.
Send note to Staff  Go to Top of Page
Valued Member
Canada
14 Posts
Posted 03/21/2024   6:38 pm  Show Profile Bookmark this reply Add DougN to your friends list  Get a Link to this Reply
In his book on the Admiral issue, Reich mentions a break in the junction line (i.e. the curved line above "CANADA POSTAGE" that meets the rectangular frame of the entire design) about 1.25 mm above the second maple leaf on the left side (i.e. very near the bottom of this line). Reich also notes that the spandrel lines (horizontal lines in corners of design) are very weak in the LL, UL and LR, and "medium" in the UR. Reich suggests 21 mm as a minimum width for a legitimate coil.

As to distinguishing a legitimate coil from a trimmed sheet stamp, if the trimming was done much later than the perforation, the trimmed edges would be less "weathered" than the remaining perforated edges. With the right equipment, this difference should be discernible when examining the stamp edges.

Straight edges should be perfectly straight or virtually so, meaning no discernable directional change. The image in Partime's post shows an obviously rough and erratic cut on the right side, while the wet printed example in Watermark's post shows directional changes on both straight edges, more obviously on the right edge. Note though that the straight edges of a legitimate coil may not be perfectly parallel with each other.
Send note to Staff  Go to Top of Page
Edited by DougN - 03/21/2024 8:23 pm
Pillar Of The Community
United States
612 Posts
Posted 03/21/2024   10:48 pm  Show Profile Bookmark this reply Add Walkman82 to your friends list  Get a Link to this Reply
Thanks to Scottamer for posting this information and everyone else who added to the discussion. I recently began collecting Canada and haven't added this issue to my collection. Now I'll know what to look for in the future.

Scott
Send note to Staff  Go to Top of Page
Member APS, USSS, AFDCS, AAPE, MEPSI, RMPL

Visit my website @ www.scottsstampcollection.com
Pillar Of The Community
3859 Posts
Posted 03/26/2024   09:12 am  Show Profile Bookmark this reply Add jogil to your friends list  Get a Link to this Reply
There are two main methods of producing imperforate straight edges on old stamps:

1) A knife cutting wheel on a perforator usually used for cutting stamp sheets into panes during perforating. Imperforate edges have a rougher look.

2) A guillotine bar cutter usually used for cutting sheets into coil strips and booklet panes after perforating. Imperforate edges have a smoother look.
Send note to Staff  Go to Top of Page
Edited by jogil - 03/26/2024 09:27 am
  Previous TopicReplies: 12 / Views: 3,212Next Topic  
 
To participate in the forum you must log in or register.

Go to Top of Page

Disclaimer: While a tremendous amount of effort goes into ensuring the accuracy of the information contained in this site, Stamp Community assumes no liability for errors. Copyright 2005 - 2026 Stamp Community Family - All rights reserved worldwide. Use of any images or content on this website without prior written permission of Stamp Community or the original lender is strictly prohibited.
Privacy Policy / Terms of Use    Advertise Here
Stamp Community Forum © 2007 - 2026 Stamp Community Forums
It took 0.21 seconds to lick this stamp. Powered By: Snitz Forums 2000 Version 3.4.05