| Author |
 Replies: 22 / Views: 3,517 Replies: 22 / Views: 3,517 |
|
Pillar Of The Community
Australia
2156 Posts |
|
|
I found this strip of 4 at the very back of an old album of US stamps - in what seems to have been the trash' section. It has quite a few tone spots, which would no doubt lower the value, but surely it's not trash. I'm wondering what US collectors think of it. 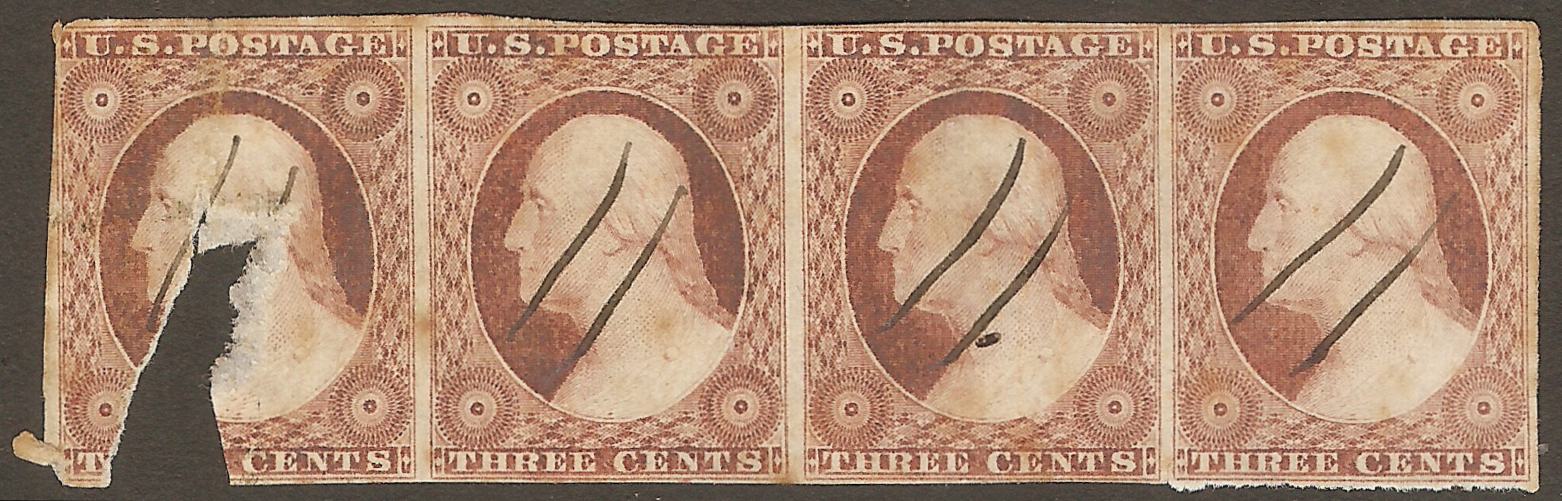 |
|
Send note to Staff
|
|
|
|
|
Pillar Of The Community

United States
1773 Posts |
|
|
Pillar Of The Community
United States
2226 Posts |
|
|
I would cut off the left 2/3 of the left stamp, leaving a big portion of the first stamp attached to the remaining strip. Having a big portion attached to any single or multiple seems to give the piece a wow factor.
I would then dip the strip in household 3% hydrogen peroxide for about ten minutes to remove most of the effects of oxidation. Then rinse in distilled water for ten minutes or so before pressing. |
Send note to Staff 
|
|
|
Pillar Of The Community
Australia
2156 Posts |
|
|
Pillar Of The Community
United States
1317 Posts |
|
|
I think CC is right on there. He knows his 3 cent-ers. The ugly stamp draws your attention and lowers the value of the strip in eye appeal. I would cut that stamp right past the damage and leave the rest. Then the attention it draws will be positive and not negative and will raise the value up a bit. It is all about eye appeal when selling stamps. |
|
Send note to Staff
|
| Edited by jaxom100 - 12/24/2017 10:58 am |
|
|
Valued Member

United States
245 Posts |
|
|
Classic Coins said: Quote:
I would then dip the strip in household 3% hydrogen peroxide for about ten minutes to remove most of the effects of oxidation. Then rinse in distilled water for ten minutes or so before pressing. This is a new trick to me, I have never heard of doing such a thing to paper - will doing this leave the paper whiter? If so very cool, will google it to see what I can find out about this trick. Thanks Classic Coins, much appreciated! Julie |
|
Send note to Staff
|
|
|
Pillar Of The Community
United States
3490 Posts |
|
|
Pillar Of The Community
United States
2226 Posts |
|
|
Pillar Of The Community
674 Posts |
|
|
It's an awesome piece. I wouldn't touch it. You didn't say what you wanted to do with it - if you're planning on selling it, then the suggestions made would make sense & potentially get you a bit more $. If you're a collector & planning to keep it, I'd mount it just the way it is. A damaged strip of 4 is much harder to find than a good strip of 3...
As far as the 'cleaning up' procedures - definitely practice on something else first! |
|
Send note to Staff
|
|
|
Pillar Of The Community
United States
692 Posts |
|
|
If it were mine, I'd follow Classic Coins suggestion and get rid of the damaged stamp. |
|
Send note to Staff
|
|
|
Pillar Of The Community
United States
2226 Posts |
|
|
jimjamtwo, I've plated your strip to positions 32R3, 33R3, 34R3, and 35R3 (32-35R3). Noting the plate positions may add interest and value if you decide to sell. Position 32R3 is the variety "With One Line Recut in Lower Left Triangle, and One Line Recut in Lower Right Triangle (1+16+17)" as identified at the link below. Unfortunately, the damage to this particular stamp probably makes it of little interest to collectors of these recutting varieties. https://www.uspcs.org/stamps-covers...amp-plating/ |
|
Send note to Staff
|
| Edited by Classic Coins - 12/24/2017 1:24 pm |
|
|
Pillar Of The Community
United States
1317 Posts |
|
|
Well, if the damaged stamp was the plate identifier, then I would leave it as is. I would mount it in a black mount with a white piece of paper behind the damaged stamp. I might even consider writing the plate position on the paper to show through the hole in the stamp. |
|
Send note to Staff
|
|
|
Pillar Of The Community
United States
2226 Posts |
|
|
The damaged stamp wasn't key to identifying the plate positions on this strip. In fact, I didn't notice the variety on the left stamp until after plating, as I used the left/right frame lines to identify the positions. |
|
Send note to Staff
|
|
|
Pillar Of The Community
United States
2226 Posts |
|
|
Here is another before and after peroxide treatment example. This stamp was soaked in peroxide for 15 minutes. I've never been able to remove 100 percent of the darkness from oxidation using peroxide:  |
|
Send note to Staff
|
|
|
Pillar Of The Community
United States
1317 Posts |
|
|
Valued Member
United States
245 Posts |
|
|
Classic Coins said: Quote:
Here is another before and after peroxide treatment example. This stamp was soaked in peroxide for 15 minutes. I've never been able to remove 100 percent of the darkness from oxidation using peroxide: Wow, that is quite a difference - I can really see the difference in behind George's head - and, I was pondering what oxidation was exactly and your picture illustrated it for me  it is the tarnish on silver, the rust on iron and the darkening of ink on stamps. I did look it up, read through some older posts in the forum, etc. I would not try it unless I had a ruined stamp already - of course I do not have any stamps that are of any value to anyone but me yet - so thank you ClassicCoins, I have learned a great lesson today, and did note that this peroxide process works best on orangecarmine, browncarmine, orangish brownish stamps, which you have illustrated with. Thank you! I am also aware that certain papers, or printing processes like gravure printing will not do well with this process. Thank you so very much Classic Coins, and Merry Christmas to you! Julie |
|
Send note to Staff
|
|
|
Replies: 22 / Views: 3,517 |
|


