| Author |
 Replies: 19 / Views: 1,039 Replies: 19 / Views: 1,039 |
|
Valued Member
Canada
122 Posts |
|
|
|
Working on a project and in need of expert help. In 1979 to 1981 small vending booklets were printed by BABN in Canada. There seems to be a series of changes made to the engraving cylinder. There were 72 booklet panes on the cylinder and the cutting guide on the tab (selvedge/selvage) was originally made of horizontal lines then changed to diagonal lines then changed again to horizontal lines. The rest of the cylinder was untouched. The flaws on the rest of that cylinder did not change so it was not a wholesale change. Any thoughts from those in the know?
|
|
Send note to Staff
|
|
|
|
|
Pillar Of The Community
United States
1873 Posts |
|
|
Because the micro-flaws on the remaining 72-subject panes remained identical, the cylinder was not completely remade or re-entered and you are looking at localized modifications made to the cutting guide indicators on the cylinder.The likely chronological explanations for this sequence of changes are these.
1. The original horizontal lines on the tab (selvedge) were etched or engraved onto the cylinder to serve as an alignment target for the automated mechanical guillotine or slitting wheels. In booklet production, these sheets are slit and sliced into strips before being bound and cut into individual booklets. Horizontal lines provided a reference point for the operators to verify that the vertical or horizontal spacing was advancing correctly through the finishing equipment.
2. The change to diagonal lines was almost certainly a remediation step to fix a doctor blade or paper-shredding issue. In web-fed cylinder printing, a long steel doctor blade scrapes excess ink off the surface of the cylinder, leaving ink only inside the recessed cells. Deep, perfectly horizontal lines run parallel to the edge of the doctor blade. As the blade passes over a sharp, continuous horizontal groove, it can drop into the groove ("blade dip"), causing ink to smear, causing uneven blade wear, or creating a continuous stress point that could nick the blade.The structural solution: Re-engraving or burnishing out the horizontal lines and replacing them with diagonal lines (or a hatched pattern) allows the doctor blade to glide smoothly over the groove at an angle. This maintains structural support for the blade and ensures clean wiping. It also prevents the high-speed paper web from catching on a hard horizontal line during processing.
3. The change back to horizontal lines indicates that while the diagonal lines may have solved a printing or tool-wear issue, they likely broke the finishing and cutting department's workflow. By 1979–1981, printing bureaus were increasingly relying on electric eyes and optical sensors to trigger automated cuts on high-speed booklet-finishing machinery. Diagonal lines alter the contrast profile and exact positioning needed for automated photoelectric sensors or manual cutting alignment. If a machine looks for a sharp contrast transition at a precise micro-second intervals, a diagonal line introduces a variable trigger point if the paper web shifts even slightly left or right.
To fix this without discarding an expensive cylinder, BABN engravers utilized localized re-entry or burnishing and tooling. They would burnish (smooth down) the diagonal lines on the tab area of the 72-subject layout and physically re-engrave or etch the horizontal lines back into the cylinder. Because this was done precisely on the outer selvage edges of the layout, the stamp designs and their existing micro-flaws on the rest of the cylinder were left untouched. |
Send note to Staff 
|
| Edited by cjpalermo1964 - 07/22/2026 8:45 pm |
|
|
Valued Member
United States
60 Posts |
|
|
An example of what you are talking about would help. Assuming it really is an engraved stamp, the transfer cylinder would not be normally reworked, but the master die. The master die would not have cut marks or alignment marks, but those would be placed there during the making of the printing plate. Typically, one stamp of a single color and integral design (meaning the whole design is engraved at once, rather than a frame, vignette, value markers, etc.) is a master die. The transfer roller is made with a single image The transfer roller is then used to place that single image on the printing plate, multiple times, in proper place to make up a plate. Any additional marks can then be added to the plate (Like plate number, alignment marks) Here is a printing plate for a Cuban Airmail stamps, the color red element. The master die would be a single engraving, transferred to the transfer cylinder, then rolled out 8 times to make a single plate. You can repeat the process many times to create as many plates as you want. Any changes, either rework the plate, or, the master die. 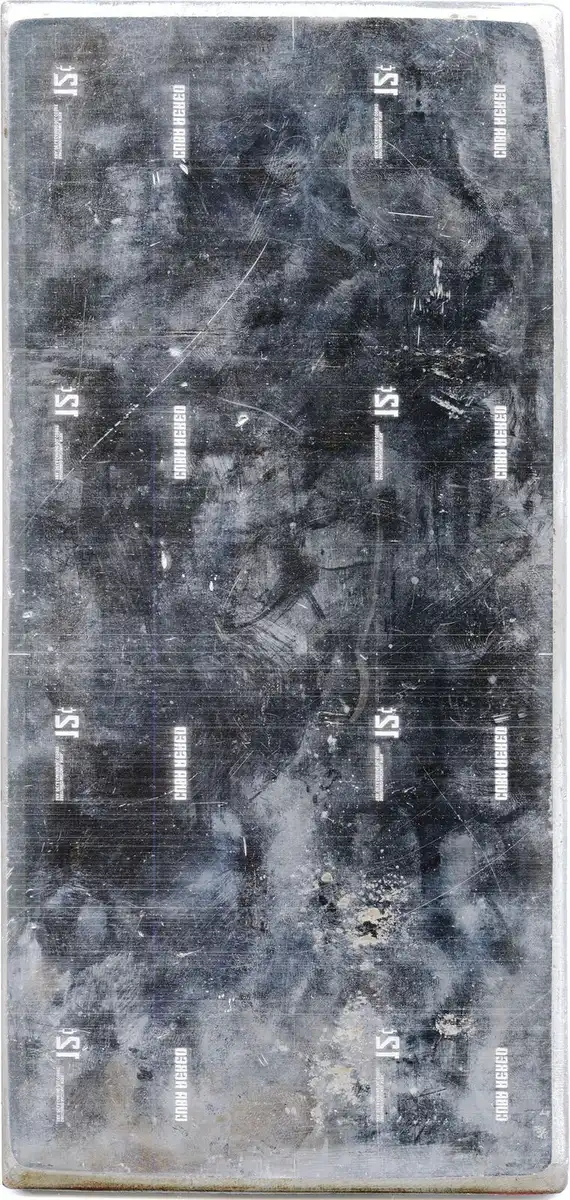 |
|
Send note to Staff
|
|
|
Valued Member
Canada
122 Posts |
|
|
Wow, this is much more than I expected. Thank you both for the great information. I think I have to show the booklet pane in order to make this clearer. 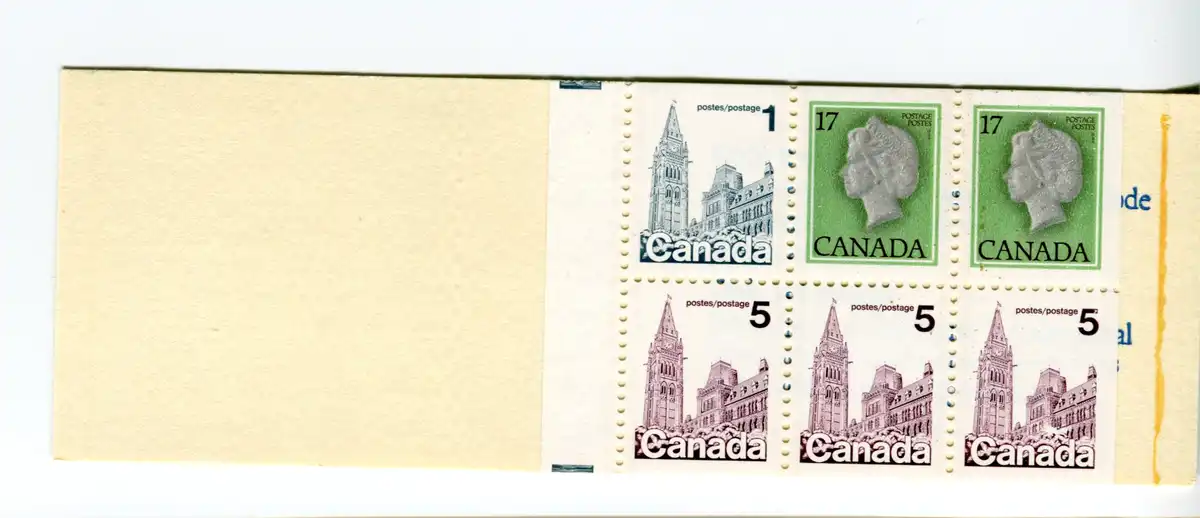 Here is one pane with the tab on the left. The cutting guides are top and bottom and yes this was the original design with horizontal lines. The new design has crossing diagonal lines then later it was changed again back to horizontal lines. Exactly as CJPALERMO64 described. But here is the problem. There were 72 panes laid out on this cylinder. Four columns of 18. So 72 cutting guides 2mm by 5mm. Was it possible to change all these without changing the cylinder. As I said previously, this is the engraved portion of the cylinder. On one tab half way between the two portions of the cutting guide there is a 2mm slash that appeared with the 1st change from horizontal to diagonal. It disappeared for the last change back to horizontal. Then there are the series of dots in the shape of a G also between the two tabs on another pane that appeared with the first change and stayed till the end. Your comment are truly appreciated. Thank you so much. |
|
Send note to Staff
|
|
|
Valued Member
United States
60 Posts |
|
|
Thanks for the picture Probably the first thing is that this is multiple colors. So multiple plates. Hard to tell if the colors overlap on the alignment lines. Assuming they do, each plate (or it sounds like this is a cylinder) has the lines. They all drop on the same spot, showing each element is aligned, as well as providing the input for the cutting or booklet making machinery. So four plates to make each sheet. On plates, what they can do is rub out the existing element, then pound the back of the plate to raise the metal to to correct height, and engrave (or more likely etch), the new element. Here is a plate where you can see the the back pounded to raise the front to receive new impression. 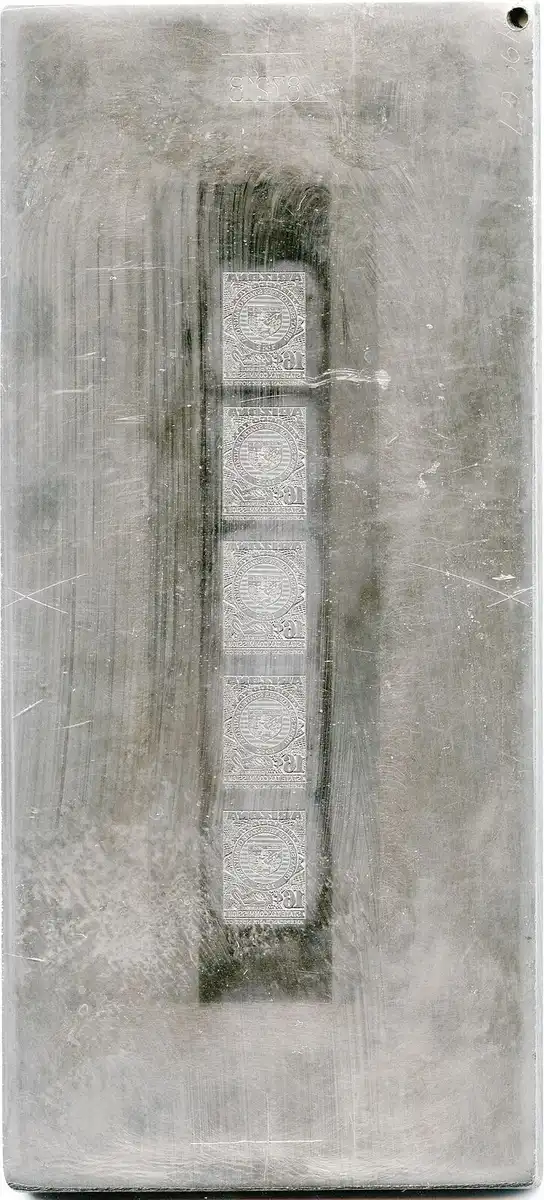 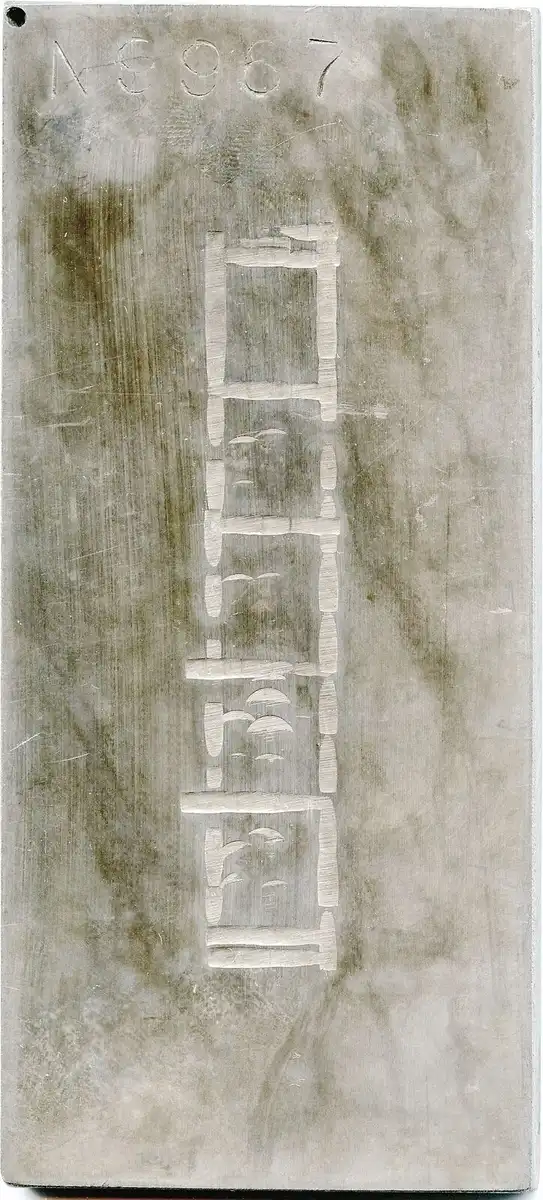 On a different note. It really is odd to have two 17c stamps, a 1c and three 5's. It is also possible they make new plates. The master dies do not change, so any unique elements remain, but a new plate can be created. Do any of these have a visible plate block (number) Each color would have a unique plate number Assuming also there were millions printed, there should be multiple plates. A plate can contain its own irregularities as well. |
|
Send note to Staff
|
| Edited by Junius_Morgan - 07/22/2026 11:42 pm |
|
|
Valued Member
Canada
122 Posts |
|
|
I also understand what JUNIUS_MORGAN is explaining. Yes this is an engraved cylinder on a Goebel BRNST-500 that also had four stations for the Gravure. When looking at the pane above you will see that the one cent stamp, the three 5 cent stamps are fully engraved and of a different color. The engraved portion on the 17 cent stamps is all the lettering. The cutting guides mostly used with an electric eye were used for cutting the open booklets once they were attached to the card stock in the Booklet Machine. The folding then happens and it spits out these booklets in series of ten different covers.
The booklet machine was separate from the printing that was done on the web and the thing with this particular printing is that it was in rolls of 56,000 booklets (4 columns of 14,000) The stamps were printed and stored for a time until they could be put into booklets one column at a time. Quite an interesting situation that had the first and last printing sent to post offices first on older covers. Then the booklet machine printer got a cleaning and the newer looking covers received the stamps that had been put against the wall (First in last out)
I would like to know how much work it would have been to change 72 (2mm by 5mm) of those guide marks twice during their experimentation. I think it was experimentation because most of the future booklets that were printed for the new postage changes had diagonal guides but not all. Quite confusing when records are not available and one has to work with lots of booklets and a bunch of repeating flaws. |
|
Send note to Staff
|
|
|
Valued Member
Canada
122 Posts |
|
|
OMG JUNIUS_MORGAN answered while I was writing.
This is a cylinder and different from the fascinating example you are showing. If I was dealing with plates I would be salivating. But this is a cylinder that printed so much faster than plates especially for booklets.
The Goebel at BABN first put down grey Queen's head and background on the first gravure cylinder. The second cylinder (gravure) put the green down, the third gravure put the invisible tagging where the perforations will eventually fall and the engraved cylinder put the rest down in one swoop. It all comes out the other end printed and perforated. Multicolor. But not in booklets yet.
You see... gravure prints 12 rows down and engraved prints 18. All in one motion.
I'm sure it is difficult to make changes to the engraved CYLINDER. That is why I am asking. Sorry for not seeing your quick response.
corrected a spelling mistake |
|
Send note to Staff
|
| Edited by bk80 - 07/22/2026 11:57 pm |
|
|
Valued Member
Switzerland
497 Posts |
|
|
But this is a cylinder that printed so much faster than plates especially for booklets
I'm not really sure what you are trying to tell here.
The usual way is:
1. You make a flat plate. The siderographer first adds to the plate whatever he needs to place the stamps in the correct positions.
2. You make a proof of the plate (on a flatbed press) and it gets an ok eventually.
3. You bend the plate and fasten it onto a printing cylinder.
4. You print.
There is no "cylinder so much faster than plate", they are one unit.
If you want to change anything, you dismount the plate, you change whatever is needed, you remount the plate. Granted with curved plates, this is much more of a burden than with flat plates.
In this example, changing the layout blocks is not a problem, it's just grunt work. You just hammer the back of the plate where the blocks are. You re-engrave whatever is needed, and the plate finisher polishes the affected areas. As the stamp designs are far away they survive without any problem. |
|
Send note to Staff
|
|
|
Valued Member
Canada
122 Posts |
|
|
Thank you for the clarification DRKOHLER. Pretty obvious why I am asking for expert help. As you may be able to see from the picture of the booklet above, the cutting guides are very close to the stamp design. Both the 1 cent and the 5 cent are on the very same cylinder. Grunt work indeed. There were 72 cutting guides on this cylinder and they were changed twice in less than a year.
I am basically asking how this was doable. I am trying to understand how this was done. How do you change 72 engraved designs on a cylinder. Not just once but twice. Not on a cylinder made of bent plates but a solid cylinder. Can't just bang out an engraved design from the top. No access from the inside of the cylinder to hammer anything out. Too much secrecy about this equipment. Even AI can't seem to help. This is why I am asking real people who may have answers. |
|
Send note to Staff
|
|
|
Valued Member
United States
60 Posts |
|
|
They may have used a plating technique to build up edges, polish and then etch new lines. It is quite possible they made new cylinders as well, as plates do have limited life. The actual stamp dies would be the same across the multiple cylinders as they come from a single dies. 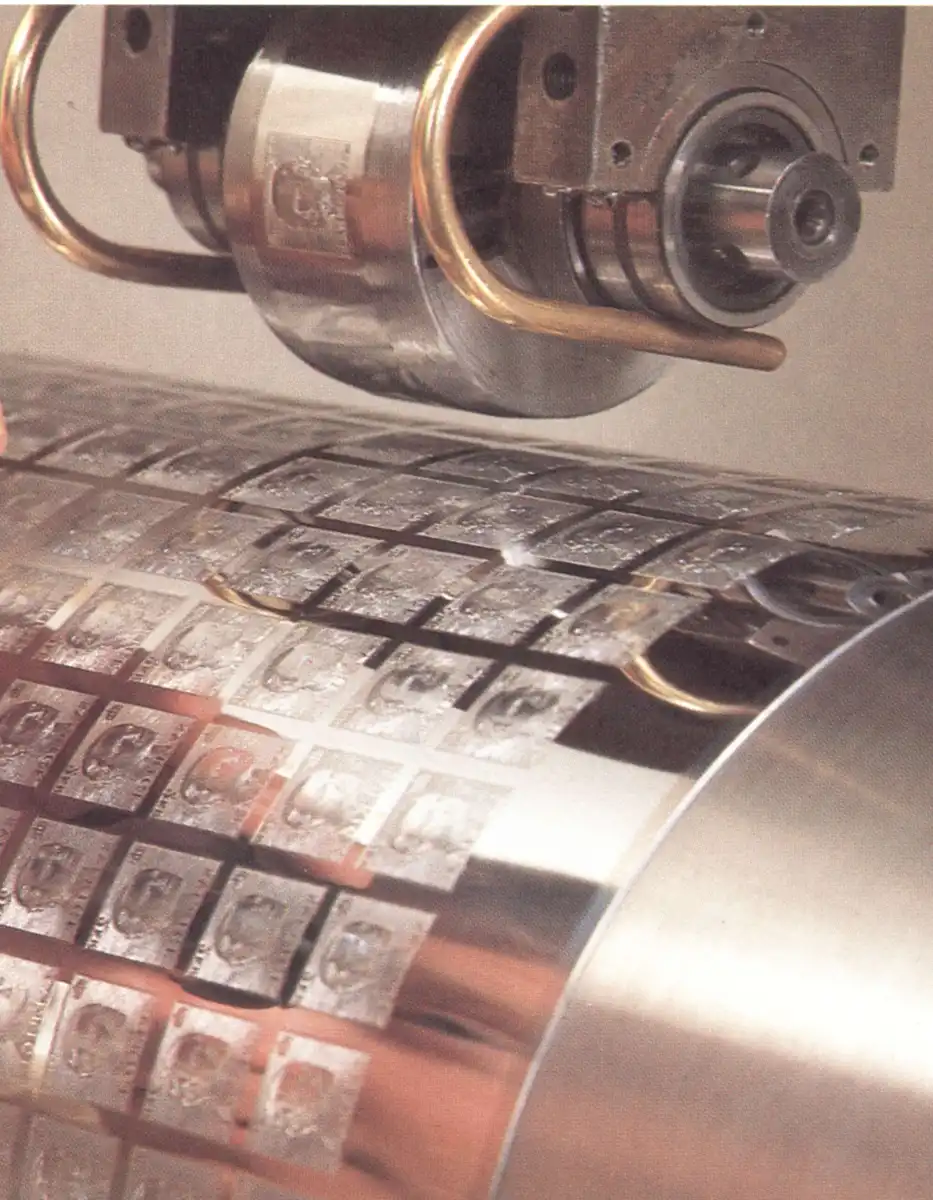 https://bnaps.org/ore/Sargent-Goebe...lPress_2.htm https://bnaps.org/ore/Sargent-Goebe...lPress_2.htm |
|
Send note to Staff
|
|
|
Valued Member
Switzerland
497 Posts |
|
|
If I understand the link above, then there are no plates involved at all at bnaps.
Basically nickle is deposited onto a cylinder and then the designs are transferred into the nickle. Excess nickle is removed by the plate finisher, the nickle is hardened and off you go. (I have no idea why this is advantageous compared to using plates..as long as nothing goes wrong).
To reengrave something like this requires unhardening the nickle, and then depending whether you want to remove or add something to the faulty area, first redeposit nickle. Then reengrave. Finally harden the nickle again.
In the case of the guide bars, this still is no problem as the bars are far away from the stamp design. In this regard, far away means more than maybe 0.1mm and it seems to be several millimeters here for guide bars. |
|
Send note to Staff
|
|
|
Valued Member
Canada
122 Posts |
|
|
Thank you for the information. It is quite difficult to find precise information about secretive processes. But that era of stamp printing is over I imagine.
About the difference between printing with curved plates and solid cylinders is in the speed of printing. Printing is twice as fast with solid cylinders. That is the big difference. |
|
Send note to Staff
|
|
|
Bedrock Of The Community
12747 Posts |
|
|
Quote:
there are no plates involved at all at bnaps Exactly. Start discussions with a factual premise and save a lot of time in baseless hypothesizing. |
|
Send note to Staff
|
|
|
Valued Member
Canada
122 Posts |
|
|
Bedrock Of The Community
12747 Posts |
|
|
Quote:
What a great way to kill a conversation. Now that is overly dramatic. Carry on with discussing plates. |
|
Send note to Staff
|
|
|
Valued Member

United Kingdom
230 Posts |
|
|
I know nothing about Canadian stamps, but that won't stop me wading in, perhaps out of my depth!
It looks as if four cylinders were required to print the four colours, and possibly a fifth cylinder if there's also phosphor ink. One or more of these cylinders may have been replaced during the lifetime of the stamp issue. It looks as if the cutting lines in the margin are printed from the same cylinder as the 1c stamp. (The 5c isn't printed from the same cylinder, because it's a different colour.) If a cylinder needed to be replaced, due to wear or damage, the marginal markings, including the cutting lines, would have to be newly engraved, even if the same die was used for the stamp image. So according to your observations there may have been three cylinders with different marginal markings, according to the changing fashions at different dates. But in the absence of marginal cylinder numbers, this is all speculation.
It's an attractive booklet that obviously deserves specialist study. Well done, and good luck! |
|
Send note to Staff
|
|
|
Replies: 19 / Views: 1,039 |
|



 Posted 07/22/2026 7:29 pm


