| Author |
 Replies: 13 / Views: 1,784 Replies: 13 / Views: 1,784 |
|
|
Rest in Peace
7742 Posts |
|
|
Hi guys..Take a look at this cut out and tell me...does every one of these have solid printing on both sides as mine does..? Thanks, Robert 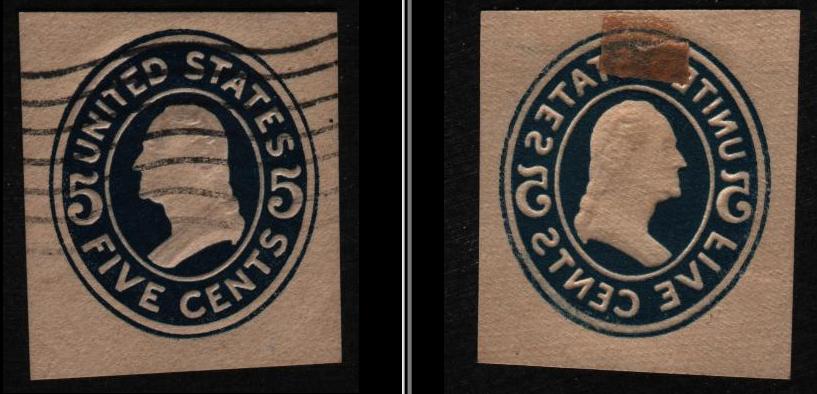 |
|
Send note to Staff
|
|
|
|
|
Pillar Of The Community
United States
3214 Posts |
|
|
Pillar Of The Community
United States
2545 Posts |
|
|
Pillar Of The Community
United States
602 Posts |
|
|
It was common to print on pre-cut envelope blanks before the invention of web printing. It was also necessary to moisten the paper so it would take ink properly. This opens the possibility of feed problems including a press cycle with no paper present causing both front and rear inked images on the next sheet of paper. Set off is similar except the wet ink from one printing is partially transferred to the back of the next. |
Send note to Staff 
|
Bill Lehr
US Postal Stationery Specialist |
|
|
Rest in Peace
7742 Posts |
|
|
Quote:
the possibility of feed problems including a press cycle with no paper present causing both front and rear inked images on the next sheet of paper
jobi01....That is the only possibility that I can see, cause the print on the back is so intense it looks like the front..Very heavy imprint..I have never seen it that heavy on any stamps I have looked at...One of a kind...haha Even the colours are not same...Front colour on left and back of stamp colour on the right. Robert  This is more like I would expect to see.... 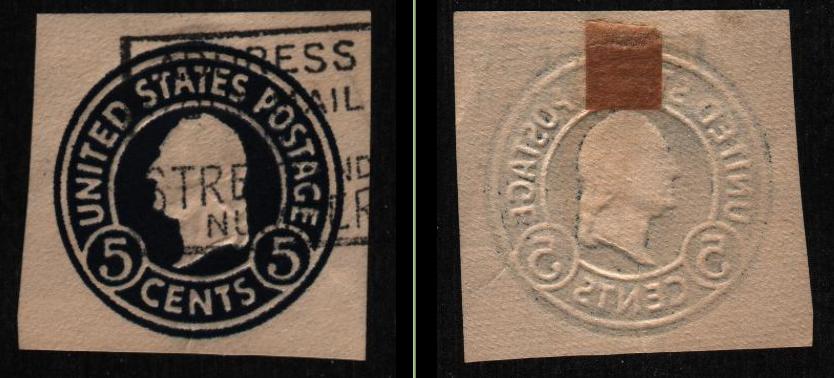 |
|
Send note to Staff
|
| Edited by wert - 04/02/2015 3:33 pm |
|
|
Pillar Of The Community
United States
937 Posts |
|
|
Wert, your scanner or software may have "exposed" the two sides differently. The obverse's black background is darker than the other. Its paper is also darker. I adjusted the brightness of the reverse a small amount and now they nearly match in ink and paper:  |
|
Send note to Staff
|
Ryan = HDNAC = DNA = HDC = Hysterical DNA Collector = Historical DNA Collector = me who just loves stamps :) |
| Edited by Historical DNA Collector - 04/02/2015 5:04 pm |
|
|
Rest in Peace
7742 Posts |
|
|
Historical DNA Collector...Good stuff, but isn't that just adjusting a stamp with software to make it look the same colour as the other..They are both a different colour in hand...I could see maybe if I sent you the stamp and you scanned it with your scanner and then possibly they would show 2 different colours..??
One way to prove my theory is to take the front of the stamp and scan it a half dozen times and see if you are correct about scanning differently...
Just a thought...Robert |
|
Send note to Staff
|
| Edited by wert - 04/02/2015 5:11 pm |
|
|
Pillar Of The Community
United States
937 Posts |
|
|
Robert, there are many possibilities. If both sides are the same "color" in hand, then that would eliminate my theory. However, I can't think of how the ink would have physically changed so much in jobi01's explanation of how a paperless printing cycle could be the cause. There are many things that can trick the eye unless you can physically compare the two sides next to each other.
You could check every nook and cranny of your software to make sure that any automatic adjustments are turned off. Some scanners and scanning software will make adjustments without you knowing about it anyway. Scanning the same or both sides multiple times wouldn't exclude automatic adjustments being made differently in every case.
A reference is needed. If you don't have a scanner calibration target, you could use a piece of black and another of white paper placed alongside your cutout. These could then be used in a photo editing program to set the black and white levels to be the same for both images. This would require using the eyedropper tool for each inside of the level dialog window. I know that both GIMP and Photoshop have this functionality. The pieces of paper aren't true black nor white so the image won't look like real life after the level adjustments, but it will allow you to compare the two accurately for difference. Make sure that you use the eyedropper tool with a large sample size or perform something like a guassian blur on the references beforehand.
Then again, this could be more effort than its worth. If you want, I'll perform the level adjustments if you supply scans of both alongside references. Another option is to be faster than your scanner. Flip the piece over after the scanning head passes it and then place it so that the other side will be caught in the same scan. Increasing scanning resolution should slow the scanning head speed.
It's interesting to ponder...Ryan |
|
Send note to Staff
|
Ryan = HDNAC = DNA = HDC = Hysterical DNA Collector = Historical DNA Collector = me who just loves stamps :) |
|
|
Rest in Peace
7742 Posts |
|
|
Historical DNA Collector...You had a great idea about being faster than my scanner..Chances are greater my scans will be in same colour adjustment...here is the fast scan..I didn't make it look pretty to prove I did a "beat the scanner scan"...haha And as you can see, I do use GIMP only , but I have a more accurate colour "eye dropper" program called "Gcolor2"..Colours are still different..go figure..  Robert   |
|
Send note to Staff
|
|
|
Pillar Of The Community
United States
937 Posts |
|
|
Well, that effectively disproves my theory. I'm now thinking that the reverse plate just received less ink. It makes sense that it would receive less ink because it didn't have ink directly applied to it during a paperless cycle. The ink that it received was from the obverse plate which didn't transfer all of the ink that was applied to it. Kinda wish I had thought about that before.
Gcolor2, interesting program but I don't see how it does more than the color selector already in GIMP. |
|
Send note to Staff
|
Ryan = HDNAC = DNA = HDC = Hysterical DNA Collector = Historical DNA Collector = me who just loves stamps :) |
| Edited by Historical DNA Collector - 04/02/2015 7:49 pm |
|
|
Pillar Of The Community
United States
937 Posts |
|
|
P.S. Comparing the two "sampled comparisons" does show that your scanner and/or scanning software is making automatic adjustments. Just something to be aware of.  |
|
Send note to Staff
|
Ryan = HDNAC = DNA = HDC = Hysterical DNA Collector = Historical DNA Collector = me who just loves stamps :) |
|
|
Rest in Peace
7742 Posts |
|
|
Quote:
Gcolor2, interesting program but I don't see how it does more than the color selector already in GIMP.
Here is the complete screen of Gcolor2 Historical DNA Collector...Unfortunately it is not for Windows or Mac. 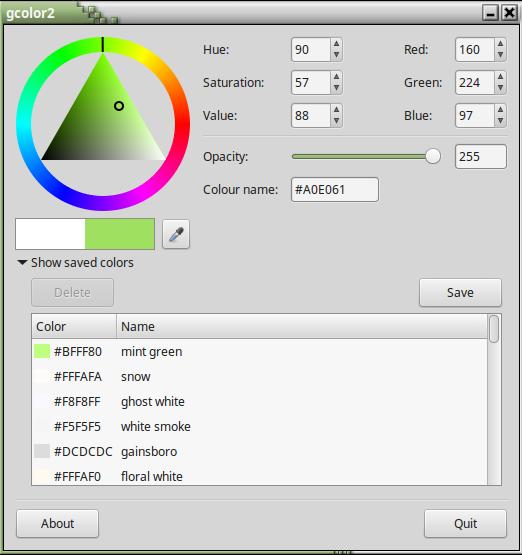 Now I did cheat a bit, I used SHOTWELL VIEWER to lightened it to get a better look at the stamps...That probably changed the colour..  Your are probably correct that maybe a sheet missed fired so to speak and the bed was inked and became part of the back of the sheet until the ink dried up.. Robert |
|
Send note to Staff
|
|
|
Pillar Of The Community
United States
602 Posts |
|
|
A common cause of perceived color differences are actually due to the thickness of the ink deposited on the paper. Darker would be caused by a thicker ink deposit. Chemically the two "shades" are identical in composition. |
|
Send note to Staff
|
Bill Lehr
US Postal Stationery Specialist |
|
|
Rest in Peace
7742 Posts |
|
|
Quote:
A common cause of perceived color differences are actually due to the thickness of the ink deposited on the paper. Yes that is true....Robert I think it is a DIE 1 to..?? |
|
Send note to Staff
|
| Edited by wert - 04/06/2015 11:55 am |
|
| |
Replies: 13 / Views: 1,784 |
|


