| Author |
 Replies: 16 / Views: 3,765 Replies: 16 / Views: 3,765 |
|
Valued Member
United States
49 Posts |
|
|
Not sure how popular this will be, but show your stamps. Stamps in album pages, your favorites or recent additions are welcome. Here are a couple of album pages from me. The first one has many blank spots and will probably take me YEARS if not more to complete, if ever. The second page is obviously a much easier page to complete, which still looks very nice and colorful. 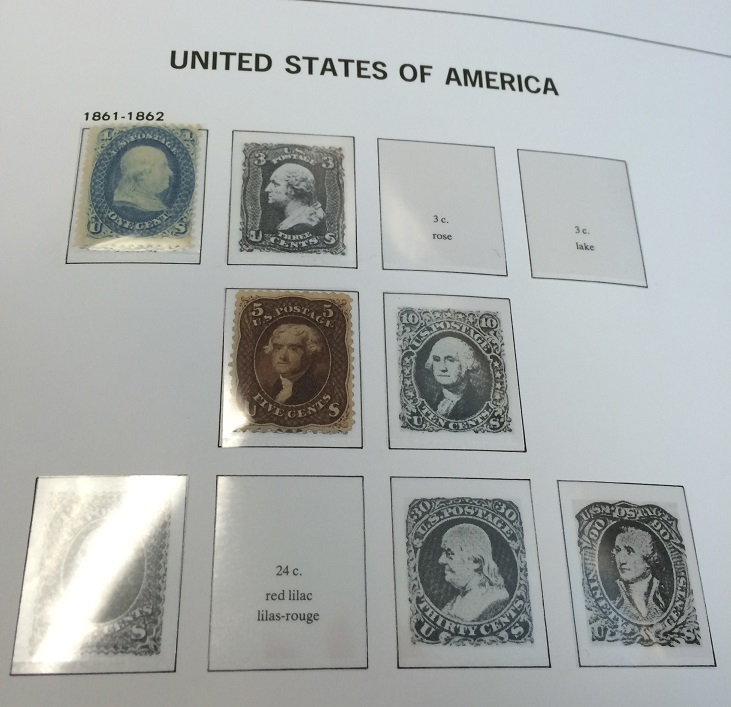 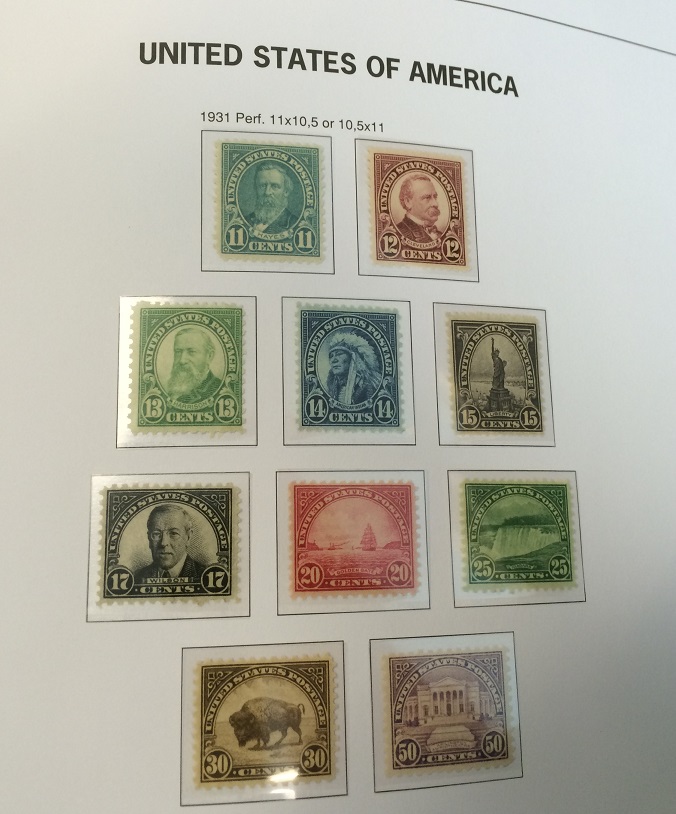 |
|
Send note to Staff
|
|
|
|
|
Pillar Of The Community
1151 Posts |
|
|
glchen Some very nice stamps you have! The color on your 699 out of this world, extremely nice stamp. My example is a strip of three of the R174P revenue. Not mint, and the cancel is very difficult to see. Wish it was on a document/instrument with a readable cancel. But all in all still one of my favorite stamps. 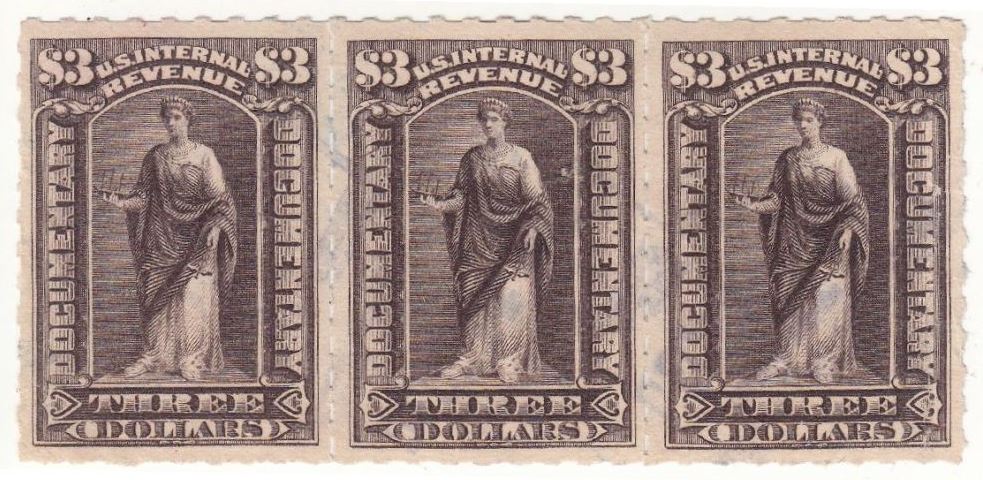 Cheers Dave |
Send note to Staff 
|
|
|
Pillar Of The Community
United States
2555 Posts |
|
|
Have you tried to run the image through RetroReveal? It may help you figure out the cancel at least. |
|
Send note to Staff
|
| Edited by sinclair2010 - 05/05/2015 04:58 am |
|
|
Pillar Of The Community
United States
1614 Posts |
|
|
Rest in Peace
United States
7097 Posts |
|
|
Pillar Of The Community
United States
1942 Posts |
|
|
glchen, you might want to double check the 5c on that first page. For the group you are showing that one is supposed to be in the color of buff, but on my screen yours appears to be a dark shade of brown, which would make it #76, or #75 if it has more red in it than I am seeing. Either way, its a nice looking stamp.
Mike33, what a mix! Did you buy that or put it together yourself? For the most cost effective way to build a collection I think you have the right idea, since you can keep a few, sell off the surplus as you go, and if done right you can reduce your net cost for what you keep to almost nothing. Very smart. |
|
Send note to Staff
|
|
|
Valued Member
United States
49 Posts |
|
|
Quote:
glchen, you might want to double check the 5c on that first page. For the group you are showing that one is supposed to be in the color of buff, but on my screen yours appears to be a dark shade of brown, which would make it #76, or #75 if it has more red in it than I am seeing. Either way, its a nice looking stamp.
Oops, you're right! I put that stamp, which is a 75 in the wrong spot. Thanks for telling me this. |
|
Send note to Staff
|
|
|
Pillar Of The Community
United States
1942 Posts |
|
|
You sure it's a #75? May I give you a comparative view of the main color choices? In the pic below all the stamps were scanned together. The two on the left are both #67 in shades of buff. Next to those is a #75 and on the far right a #76. Note how the #75 has a reddish tone that the #76 does not. If all I had given you was the darker shade of #67 and the left stamp of the two browns, with no explanation, would you have been able to sort them out? I must confess that without reference material for comparison, I would have found that challenging. So here they are: 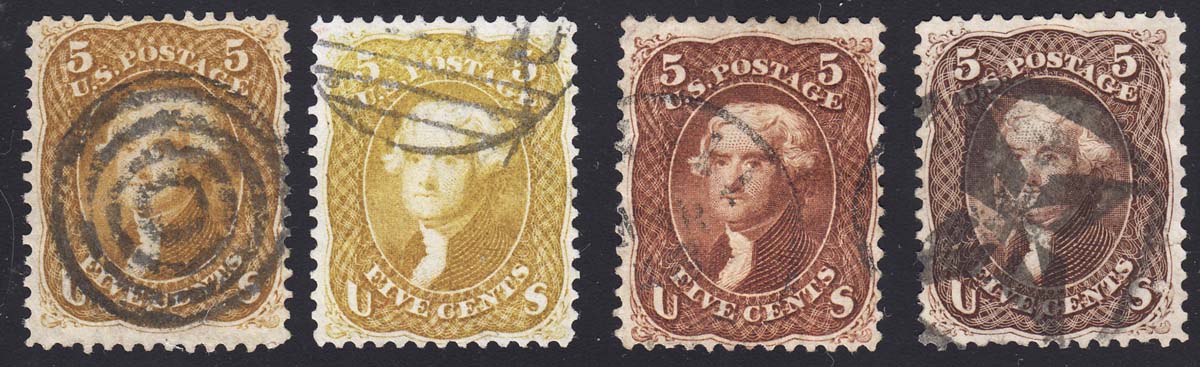 Sorry for the intrusion on the purpose of the thread, but I hope this helps. |
|
Send note to Staff
|
| Edited by essayk - 05/05/2015 1:40 pm |
|
|
Pillar Of The Community
1151 Posts |
|
|
sinclair2010
I've heard of this retroreveal, but because I have a scanner and a photo software, I can do the same thing by myself. I've tried various routines to enhance the cancel, nothing worked.
But thanks anyway.
essayk, your last post, interesting comparative view, nothing like a reference collection in regards to the more difficult stamps. I maintain a reference collection, mostly shop worn stamps, but still valuable for comparative references.
Dave
|
|
Send note to Staff
|
|
|
Valued Member
United States
49 Posts |
|
|
Quote:
You sure it's a #75?
May I give you a comparative view of the main color choices? In the pic below all the stamps were scanned together. The two on the left are both #67 in shades of buff. Next to those is a #75 and on the far right a #76. Note how the #75 has a reddish tone that the #76 does not.
Thanks, I appreciate the post. I'm definitely a new collector, so it's always good to learn new things. I don't have my album with me at this moment, so I'll take another look at it later. However, I did purchase that stamp from a Siegel auction where they advertised it as a #75. It also came with a 1989 PF cert which said it's a #75 too. I do agree that it does look brownish from the photo. Not sure if that's because of the lighting or something. |
|
Send note to Staff
|
|
|
Pillar Of The Community
United States
1942 Posts |
|
|
Quote:
However, I did purchase that stamp from a Siegel auction where they advertised it as a #75. It also came with a 1989 PF cert which said it's a #75 too. I do agree that it does look brownish from the photo. Not sure if that's because of the lighting or something. Hehe. Well, with documentation like that you probably don't need to take a second look at your stamp. The photo isn't giving us a good look. You might want to play with the lighting to see if you can brighten up the stamp and show the true colors. As you look at the pic on your screen and the actual stamp, how do they compare? In any case, you have a nice stamp there. |
|
Send note to Staff
|
|
|
Valued Member
United States
49 Posts |
|
|
Not sure if this helps, but here's another picture of that stamp in the right spot on the album. It does look more reddish in person, so there might still be some lighting issue. 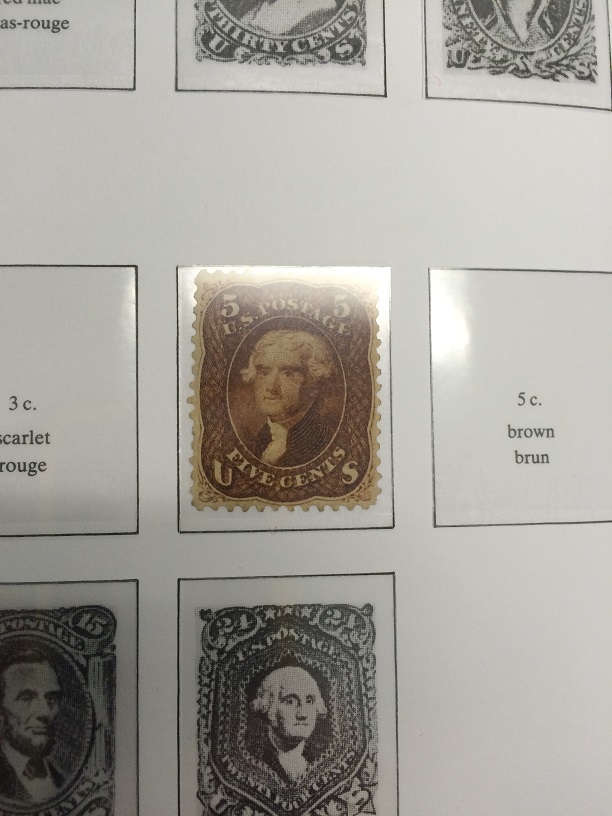 |
|
Send note to Staff
|
|
|
Pillar Of The Community
United States
1942 Posts |
|
|
It would be fun to see that stamp, but to do it right you will need to take it out of the mount and place it on a black surface, such as the back of a plastic stock card which has a dull finish. Anything shiny in the picture will interfere. Shine a light from the sides, angled evenly over the surface, and hold the recording device (camera, cell phone, whatever) so its focal plane (usually the "back" of the device) is parallel to the stamp.
You don't need to struggle through that though, since you already know its a #75 from your cert. |
|
Send note to Staff
|
|
|
Valued Member
United States
49 Posts |
|
|
Quote:
It would be fun to see that stamp, but to do it right you will need to take it out of the mount and place it on a black surface, such as the back of a plastic stock card which has a dull finish. Anything shiny in the picture will interfere. Shine a light from the sides, angled evenly over the surface, and hold the recording device (camera, cell phone, whatever) so its focal plane (usually the "back" of the device) is parallel to the stamp.
Thanks for the tip here. I've always wondered what the best way to take pictures of stamps was. Thanks! |
|
Send note to Staff
|
|
|
Pillar Of The Community
United States
1756 Posts |
|
|
Long awaited delivery... multiple screwups by USPS... from Utah to California, back to Utah then back to California again... weeks to arrive...  |
|
Send note to Staff
|
|
|
Pillar Of The Community
United States
1614 Posts |
|
|
Quote:
Mike33, what a mix! Did you buy that or put it together yourself? For the most cost effective way to build a collection I think you have the right idea, since you can keep a few, sell off the surplus as you go, and if done right you can reduce your net cost for what you keep to almost nothing. Very smart. I bought that about a year ago. It was all from one album and after removing and soaking, before sorting. I wanted to make a nice desktop wallpaper for my PC but forgot to save the high resolution scan for some reason so it looks all pixelated when making any larger than it is here. Forgot what I paid for the album. Somewhere around $200. More than I usually paid but was after the official stamps at the time and there were a lot of them. I filled tons of holes with this lot. There was definitely some nice stuff in it. thanks |
|
Send note to Staff
|
|
|
Replies: 16 / Views: 3,765 |
|


