OK, my preferred method of quickly distinguishing between 1702 and 1703 is to use a short-wave UV lamp. #1702 is overall tagged (entire stamp glows green), while #1703 is block tagged (single rectangular shaped block glows green). But not everybody has a short-wave UV lamp.
The problem with the 2 usual methods --
1. Snowflaking sometimes appears a little on #1702, but not to the extent that it usually does on #1703. So sometimes this method is not reliable until you see a real #1703.
2. The distance between the base lettering (circled in green in the scan below) and the design is usually ~0.5mm for #1702 and ~0.75mm for #1703. The problem is that those measurements assume a near-perfect color registration in the printing process. Your other pic of #1702 actually shows a poorly registered black color, which makes it look really close to the design. In the pic below in the green circle, the black is also slightly misregistered in the other direction. Comparing those 2 blocks may give the illusion that you have a #1703. It is better to compare color. Lettering in #1702 is black, while the lettering in #1703 is gray-black. Your scans clearly shows black lettering for both. But even this black color shade is not reliable because of color loss when stamps are not store properly. Two very slightly different fonts were actually used in the lettering for #1702 and #1703 -- but the difference is minimal and hard to distinguish if the print is not perfectly clean/clear. The method I used to determine you had a #1702 is explained below the pic.
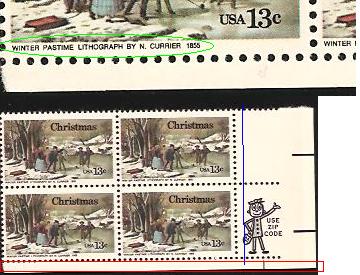
The reasons why you definitely have a #1702 (aside from the fact that Mr. Zip is present).
1. The perforator used only extends 1 extra perf into the selvage. In the scan above, the perfs in a #1703 would stop at the thin blue line I drew in the right selvage of the block, and there would be NO perfs to the right of the blue line.
2. The Combination (A) Press used to print #1703 will ONLY have 2 selvage margins. Therefore, you should NOT have a top nor bottom selvage (I drew a red rectangle around that selvage in the pic). Sometimes you will see a straight edge or a very thin (1-2mm) "selvage". It's actually NOT selvage, but a miscut that either cut off the perforations (hence straight edge), or accidentally cut into the next stamp of the other sheet (hence, an apparent very thin selvage). The A Press for that printing was a cylinder that printed continuously without producing a margin in between. Therefore, you ONLY see selvage to the right or left of the stamp.
I hope the pics helped and the explanation not too confusing.

k


 1702mzb.jpg
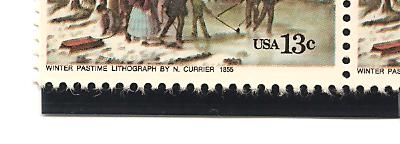 1702mzbb.jpg
 1703mzb.jpg
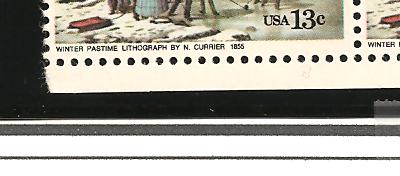 1703mzbb.jpg


